|
||||||
|
||||||
 Karting
|
For a printable version of the guide click here. What does the navigator have to do? The navigator has quite a few things to occupy him. Before the event he must obtain the correct map and ensure that he has all the essential items. During the rally, it is the navigator who works out the correct route from the clues provided (usually with some help from the driver) and then directs the driver in the right direction, making sure not to lose his place on the map and warning the driver of any disastrous bends which lie ahead. Whilst doing all of this the navigator has to keep track of how much time is remaining for the section and tell the driver to speed up or slow down accordingly. The Map All BUMC rallies are run on 1:50 000 OS maps (sheet 172), readily available from either Waterstones or Blackwells. The Roamer A useful item as it allows very accurate plotting of grid references using the 'pointy' bit, whilst the collection of holes in the middle are of sizes corresponding to radii of 50m, 100m, 200m and 400m on the map and are useful for plotting 'Black Spots' and 'Quiet Zones'. Roamers can be bought from motorsports shops, but can easily be made from cardboard and sticky backed plastic etc. The Map Board Another item essential to being a good navigator, as it will enable you to draw the route on the map without ripping holes in it. Whilst providing a solid base to write on, it also needs to be collapsible in the case of an accident and this will be checked at scrutineering. The ideal material for a map board is corrugated cardboard, two sheets stuck together with the "grain" in opposite directions should be sufficient. The bigger the board the better, although it must fit inside the car, 18inch square is ideal. The Map Light Although crews have won rallies with a hand-held torch, it is useful to have both hands free for navigating. If you do fit a map light in the car, it is worth spending time getting it positioned properly so you don't have to sit unnaturally to use it. Also... Pencils, and lots of them to allow for breakages and losses. Soft ones (2B are ideal) will not rip the map. Always keep one handy, along with a good rubber. And finally, a stopwatch to keep track of the minutes. A watch will suffice and can sometimes be easier to use. BEFORE THE RALLY The entry to a rally opens 3 or 4 weeks in advance, allowing you to sign up (and pay!) guaranteeing you a space. Supplementary Regulations (SR) will be issued a week or so in advance of the rally. These will detail when the rally takes place and which map you will need, also the rules and points scoring system. It will also give details of signing-on and scrutineering, which you must attend. This will be on the night of the rally, a few hours before it starts (typically 6.30pm in the university precinct). You will be expected to present your insurance details to the secretary of the meeting and also pay the entry fee, if you have not already done so. Meanwhile the driver will have to present the car to the scrutineer to ensure that important things like lights, horn and brakes are working etc. In the past, this has always taken place in Queens Building, but this car park will be closed to the publice in the near future, so we will have to use a different car park. This will be notified in advance. You will then be issued with Final Instructions, an important document, as it will tell you the start location and time, any amendments to the SR's and also the list of Black Spots and Quiet Spots. Black Spots are sensitive areas, and entry into one will result in exclusion. Quiet zones may be used after switching off any spot-lights, and whilst travelling in as high a gear as possible. In addition to those given on the final instructions, all 30mph and 40mph zones are designated as quiet zones. Now that you have your map, roamer and list of black spots and quiet zones the process of marking up the map can begin. Everybody has their own way of marking the map, but the essential things to get down are the dreaded black spots and quiet zones. These are usually given in one of two forms:
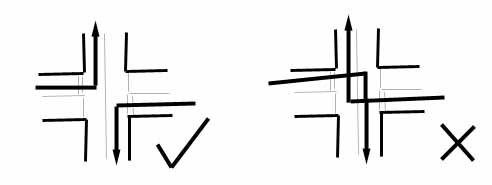
Most people mark black spots with heavy shading to obliterate them completely but quiet zones only need light shading, so you can see the roads in the area, as the chances are you will be passing through. Some people also highlight such things as grid numbers, spot heights etc. in order to make them easier to find in a hurry. So, now you are ready for the start of the rally. NAVIGATION - THE TRICKY BIT! The first thing to realise is that anything goes! It has often been a favourite pastime of rally organisers to devise their own interpretations of any existing types of 'nav' to fool those amongst us who are called (often laughingly) expert navigators. If you're new to this game, then don't worry too much as you will be classed as novice and will receive relatively simple nav. A FEW GENERAL POINTS The route will be unambiguous, but if it isn't then always take the shortest route consistent with the information given. This is a rule governing nav. The route should never cross itself at all. There is an apparant anomoly with this rule, concerning crossroads:
As the diagram shows, turning left twice at the same crossroads from opposite sides is permissable, since although you are visiting the same junction twice, your route does not actually cross itself. However, turning right twice at the same crossroads is not allowed, since the route is crossed. Note - You are allowed to travel down the same road, in opposite directions. Navigation is always 'as map' and not 'as road'. In other words, if you arrive at a junction and it doesn't correspond to what appears on the map, the navigation will fit the map and not the road. White roads and paths are ignored for the purposes of navigation, unless they form part of the route, in which case it will be made clear that the road is white (whites are shown as dotted lines on herringbones, grid squares, tulips etc.). Complicated junctions, particularly roundabouts and dual carraigeway junctions, will be treated in the nav as several smaller junctions which go together to make the complete route. For example, 'Take the 3rd exit from a roundabout' would be treated as: Turn left at a T-Junction (onto roundabout) Miss a left side-road (first exit) Miss a left side-road (second exit) Take a left side-road (third exit) VIAS AND AVOIDS These are the most elementary forms of navigation and basically just define a set of points to go via or to avoid, the shortest route consistent with the information is the correct route. The points defined could be grid references, spot heights on the road, grid lines crossing the road, a letter in a place name written across the road, in fact, just about any symbol, line etc. on (or very near) the road. In the case of novice nav. the vias and avoids will probably be in order, for experts they will often be listed randomly. TULIPS
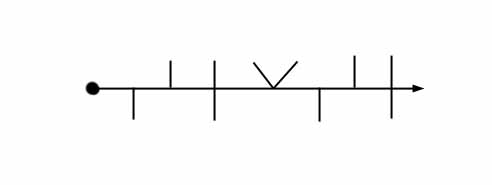
Tulips are another extremely simple and easy to follow form of nav. Tulips are basically just an illustration of the junction as it appears on the map. For novices, there is a dot indicating the direction of entry to the tulips on the left. For experts, the tulips often don't have the dots and arrows, and sometimes only every other junction is shown. Tulips are often shown in a different orientation to the map, so a little spatial reasoning may be required! GRID LINES With this form of nav, all you will receive is a large collection of numbers, a lot of which are very similar in value. These numbers represent grid lines which the route crosses, in the order given. In the more complicated nav, these numbers may be reversed or stuck together etc. It is usually easy to spot grid lines as a type of nav, as distinct from spot height, because you will see several repititions of the same numbers. DIRECTIONS Here the navigator gets a long list of directions (N, S, E, W etc) and these will represent one of two things: The side by which the route leaves the current grid square, in which case compound directions (NW, SE, SW etc) will be rare but not non-existent (you can leave a square via the corner). The direction in which the route leaves the next junction, in which case there will be lots and lots of compound directions. HERRINGBONES The best way of explaining a herringbone is to think of it as a piece of string laid out along the correct route, with all the junctions indicated as lines either side of the string in the appropriate positions. The string is then pulled taut into a straight line, showing all the roads missed on the section.
Studying the herringbone above, the first junction could be one of two things. It could mean 'carry straight on missing a road on your right' (which is how it appears at first sight), or it could also mean 'turn left either at a junction or into a side road'. Similarly the second junction means either 'go straight on' or 'turn right'. The third junction is obvious, and means 'straight on at crossroads'. The fourth junction means 'turn right at crossroads'. Since every junction appears on the herringbone, it is a simple matter to follow through one by one and plot the route, mistakes will be obvious if you make them, as the junctions will cease to fit! Now for the infamous Circular Herringbone:
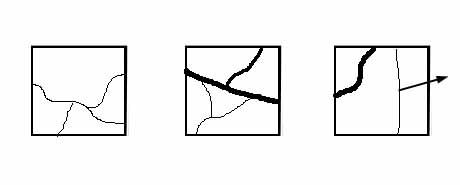
The main problem is that you obviously have a choice of two directions to choose from. The dot is not necessarily the start of the section, but can be specified as something on the route. If you know that the dot corresponds to the start of the section, then it is easy to deduce which way round the herringbone you are meant to go, you simply try it one way and if it doesn't work, you go the other way! If the start point is in the middle of the route, it becomes more difficult, as you could be travelling either way on the road at that point, and you still have to decide which way round the herringbone to go! That gives you four possibilities to go at. If the organisers are feeling really sadistic, they could reverse the meaning of each juction by putting the spars on the opposite sides. Another confusing tactic is showing only every other junction on the herringbone. This is when the map becomes in danger of being torn to shreds! The secret to herringbones is to keep a cool head, take it junction by juncion and keep telling yourself "It's not really difficult, is it?". TRACINGS These really are very simple, consisting of the correct route traced onto the nav. sheet. All you need to do is take your sheet of tracing paper, trace out the nav onto it, and somehow make it fit the map. There may be a few complications such as the route is split into two pieces, rotated or reflected etc. then rejoined, but once you've made part of it fit, the rest is usually easy to figure out. YELLOWS 'Yellows', as they are known, are groups of the letter 'Y', 'R', 'B', and occasionally (but only if required) 'W'. These letters stand for yellow, red, brown and white respectively. Each group represents one junction on the map. The first letter of each group indicates the colour of the road you enter the junction on, and the final letter indicates the colour of road you exit the junction on. The letters in the middle indicate any other roads at the junction which are not part of the route. For example: YBBY YYY YYY YYYY YYY YBYB BRR 'YBBY' usually means straight across a brown road at a crossroads from a yellow road to another yellow road. 'YYY' means turn left or right at a junction with three yellow roads. Clearly it is necessary here to look ahead to find out which way is correct! For instance, if the next junction features 4 letters on the nav, then you can look ahead for a nearby crossroads. 'YBYB' means turn left or right from a yellow road onto a brown road at a crossroads. In more difficult standards of nav, the junctions nay all be grouped together! For example, the above sequence would become: YBBYYYYYYYYYYYYYYYBYBBRR In this case it is necessary to try to split the code up into the original junctions. The main problem comes when there is a large string of 'Y's in a row. this is quite a common occurrence since most of the roads used on rallies are yellows. The trick is to count up any long series of 'Y's and divide by three to find out how many junctions you must go through. From here you simply find a route which has the correct number of junctions along it. TL's AND TR's These are very straight forward and simply indicate the direction to take at each junction. TR means turn right, TL means turn left and SO means straight on. Any of the above may be followed by the letter 'X', indicating the junction is a crossroads, for example SOX means straight on at crossroads. For example: TL TR TRX SOX SO TL's and TR's may be further complicated by being given in code: AF AB ABC DEC DE or AFABABCDECDE Code: (T=A, R=B, X=C, S=D, O=E, L=F) For novices, the code should always be given, for experts this is often not the case. SQUARES
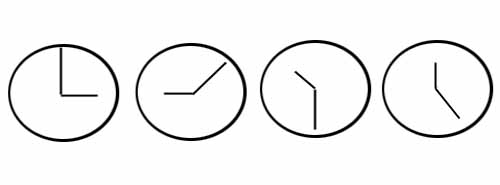
Squares are an illustration of one or more grid squares along the route. Once you have located the appropriate squares on the map, the shortest route through the squares is always the correct one. If there are any ambiguities or deviations from the shortest route, these may be indicated by dots on the entry to a square or arrows on the exit. CLOCKS Clocks are another pictorial form of navigation.
The hour hand usually indicates the direction of entry to the junction, and the minute hand the direction of exit, remember "In on the hour hand, out on the minute" and you shouldn't have any problems. Another interpretation of the same theme is the digital clock, where the time is given digitally, and you have to visualise the corresponding clock face to establish the directions of entry and exit.For example, the above sequence of clocks would become: 3:00 9:10 10:30 12:25 To further complicate things (usually for experts) it is sometimes stated that your clock is wrong. For example the above sequence could be written: 2:30 8:40 10:00 11:55 YOUR WATCH IS HALF AN HOUR SLOW Twenty four hour digital clocks may sometimes be mixed with twelve hour ones to add to the confusion! As indicated at the beginning of this guide, it is also the navigators job to keep track of the elapsed time for each section. The twelve car rallies that this club runs are classed as navigational events, and as such the maximum permitted average speed is 30mph. This may not sound much, but once you've spent a couple of minutes stationary working out the nav, you only need to go off route once to make it difficult to make the average for that section. ROUTE CARD
The illustration above shows a typical route card. The route card is filled in as follows: At the start, the marshall in charge will enter your departure time. Any passage Control boards (PC boards) noted while driving the section from the start to TC (Time Control) 1 must be written in the boxes provided. On arrival at TC1, the marshall will enter your BBC time of arrival in the appropriate box. He will also put a line through any remaining blank PC boxes and sign the sheet to ensure that PC's are not added after. If you are the only crew at that TC, the marshal will write your departure time in the next box and give you the next piece of nav to wrestle with. KEEPING TIME At the start of the rally, you will be given a list of references for the TC's, the length in miles of each section and the time allowed. It is a good idea to pencil in your target times on the route card so you don't have to fish around in the footwell for the inevitably crumpled piece of paper with the section times. Now you know how long you have for each section and what time you departed, it is a simple task to establish your desired time of arrival at the TC. How you get your driver to achieve this time is up to you. The simplest way is to drive as quickly as feels safe, and if you arrive early at the TC, wait outside until your time comes up and then go in. It is up to each individual how they decide to keep a track of the elapsed time on each section. Some use a stopwatch, which is reset on leaving each TC. This is good as a rough guide of the time taken, but care must be taken, as by using this method, you don't take into account the reading of the second hand on the marshal's watches, and can lose/gain a minute here and there. Therefore, your watch is the only accurate guide, provided it is synchronised with that of the organisers! SCORING AND PENALTIES The scoring system is described in detail in the Supplementary Regulations, but a brief outline will make you appreciate the importance of timing. Teams receive marks for minor time infringements (1 mark per minute late at a TC for example) and fails for more serious mistakes (1 fail per missed PC board, or 3 for arguing with a marshal - take note!). Clearly, therefore, fails are more serious than marks when results are calculated, and the crew with least fails will win. Hence, more importance is placed on following the correct route than racing between TC's at breakneck speeds missing all the PC boards because the navigator is hiding under the dashboard! So, goodbye and GOOD LUCK! Adapted by Paul Willies from The BUMC Crucial Guide to Navigation booklet |
||